Time:2025-09-18
Implementing DALI D4i sensor connectivity can seem like a complex task, but with the right guidance, it becomes manageable. This guide will walk you through the procedures needed to successfully implement DALI D4i sensor connectivity in your lighting systems. We'll cover everything from understanding the basics of DALI D4i, to the step-by-step implementation process. Let's dive in!
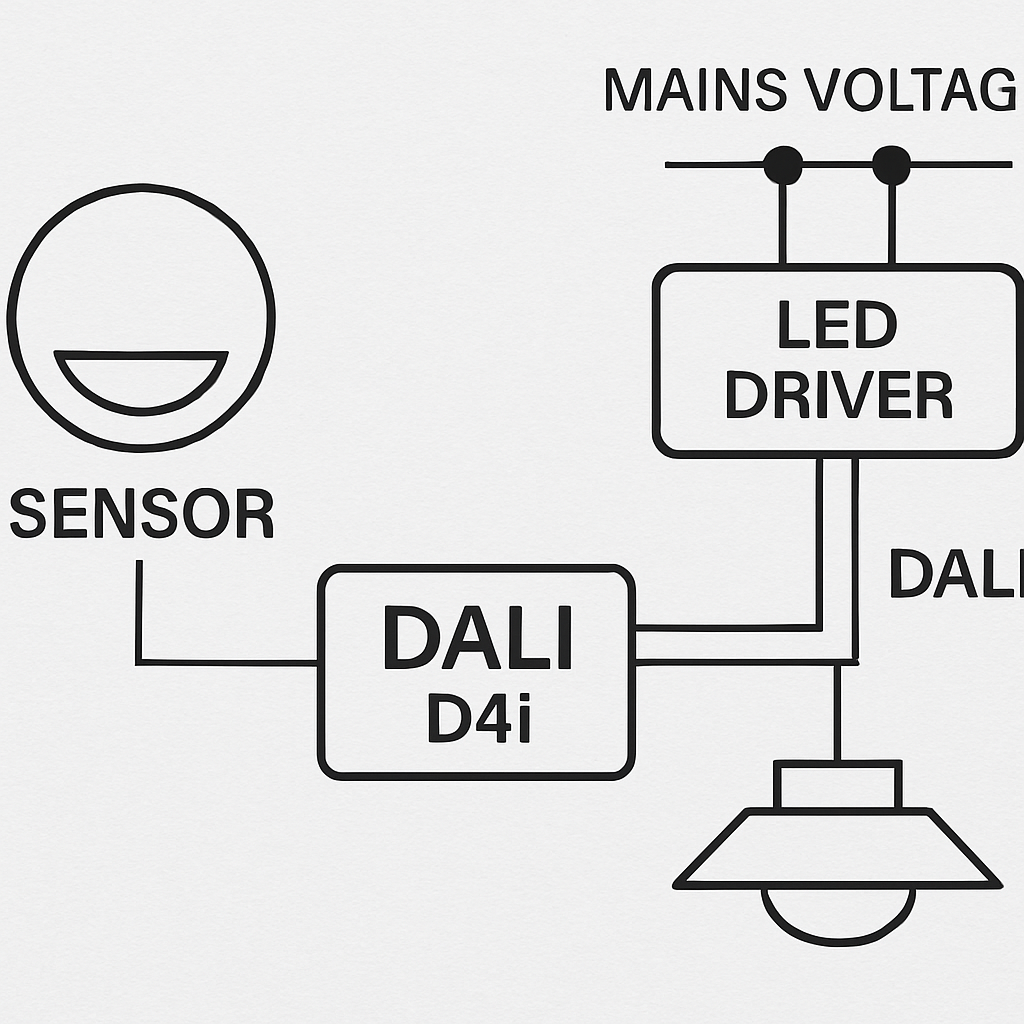
DALI D4i stands for Digital Addressable Lighting Interface, with "D4i" representing the latest iteration of this smart lighting technology. It enables seamless communication between lighting devices and sensors, enhancing the efficiency and functionality of lighting systems. The DALI D4i system is particularly notable for its ability to provide power and data communication over a single cable, simplifying installation and reducing costs.

Sensors play a crucial role in DALI D4i systems. They are responsible for gathering data such as occupancy, light levels, and energy usage, which can then be used to optimize the lighting environment. By integrating sensors with DALI D4i, you can achieve more efficient and responsive lighting solutions.
Implementing DALI D4i sensor connectivity offers numerous benefits, including:
Energy Efficiency: By using sensors to control lighting based on occupancy and ambient light levels, you can significantly reduce energy consumption.
Cost Savings: The reduction in energy use translates to lower utility bills.
Improved Lighting Control: DALI D4i systems allow for precise control over lighting, enhancing the comfort and productivity of occupants.
Scalability: The system can be easily expanded or reconfigured as needs change.
Before diving into the implementation process, it's essential to prepare adequately. Here are some steps to follow:
Start by evaluating your existing lighting system. Determine the types of fixtures and sensors you currently have and how they are controlled. This assessment will help you identify what needs to be upgraded or replaced to support DALI D4i connectivity.
Ensure that the components you select for your DALI D4i system are compatible. This includes selecting DALI D4i certified drivers, sensors, and other devices. Compatibility is crucial for ensuring seamless communication and functionality within the system.
Design a layout plan for your lighting system that outlines where each sensor and fixture will be placed. Consider factors such as coverage area, sensor range, and mounting locations to optimize performance.

The first step in the implementation process is to install DALI D4i drivers in your lighting fixtures. These drivers are responsible for enabling communication between the fixtures and the DALI system.
Turn Off Power: Before installation, ensure that the power to the lighting circuit is turned off to prevent any electrical hazards.
Connect the Driver: Install the DALI D4i driver into each lighting fixture according to the manufacturer's instructions. Make sure all electrical connections are secure.
Test the Installation: Once the drivers are installed, test each fixture to ensure they are functioning correctly.
With the drivers installed, the next step is to integrate the sensors into the system. Here's how:
Mount the Sensors: Install the sensors in their designated locations. Ensure they are securely mounted and positioned to provide optimal coverage.
Connect to the Network: Connect the sensors to the DALI network. This typically involves wiring the sensors to the DALI bus, which allows them to communicate with the lighting fixtures.
Configure Sensor Settings: Use the DALI control software to configure the sensor settings, such as sensitivity and detection zones.
Programming is a critical step in the implementation process. It involves setting up the logic that controls how the sensors interact with the lighting fixtures.
Use DALI Software: Employ DALI control software to program the system. This software allows you to set up control groups, scenes, and schedules that dictate how the lighting responds to sensor inputs.
Test the Programming: After programming the system, conduct thorough testing to ensure that everything is working as expected. Adjust settings as necessary to optimize performance.

Even with careful planning and execution, issues can arise during the implementation process. Here are some common problems and their solutions:
Communication Errors: If sensors or fixtures are not communicating, check all connections and ensure that devices are correctly addressed within the DALI network.
Inconsistent Lighting Response: If lighting is not responding consistently to sensor inputs, re-evaluate the sensor settings and make necessary adjustments.
Software Configuration Issues: Double-check the control software settings to ensure that all parameters are correctly configured.
Implementing DALI D4i sensor connectivity can greatly enhance the efficiency and functionality of your lighting system. By following this guide, you can confidently navigate the process, from selecting compatible components to programming the system. Remember, the key to a successful implementation is careful planning and thorough testing. With these steps, you're well on your way to creating an intelligent, responsive lighting environment.
By integrating DALI D4i sensor connectivity, you not only improve energy efficiency and cost savings but also enhance the overall experience and comfort of the environment. Happy implementing!
