

Time:2025-12-30
Indoor lighting sensor range is the area in which a sensor can detect occupancy, measure ambient light, and trigger a lighting response. It is not necessarily the same as wireless communication distance.
For lighting control projects, specify four separate ranges:
Occupancy detection range: the area where movement or presence can be detected.
Coverage pattern: the shape of the detection field, such as 180°, 360°, radial, or linear coverage.
Mounting-height range: the height at which the stated coverage is valid.
Wireless communication range: the distance between sensors, luminaires, controllers, or gateways.
The right indoor lighting sensor range is the one that matches the room layout, lighting zone, occupant behavior, and control objective—not simply the largest number on a datasheet.
Poorly matched coverage can cause false-on events, missed occupancy, uneven daylight dimming, and occupant complaints. For example, a sensor aimed toward a corridor may activate an office when someone walks past, while a narrow ceiling sensor may miss a workstation or restroom stall.
The U.S. Department of Energy identifies occupancy sensing and daylight-responsive control as important interior lighting strategies. It also notes that PIR sensors require an unobstructed line of sight, while ultrasonic sensors do not require the same direct line of sight.
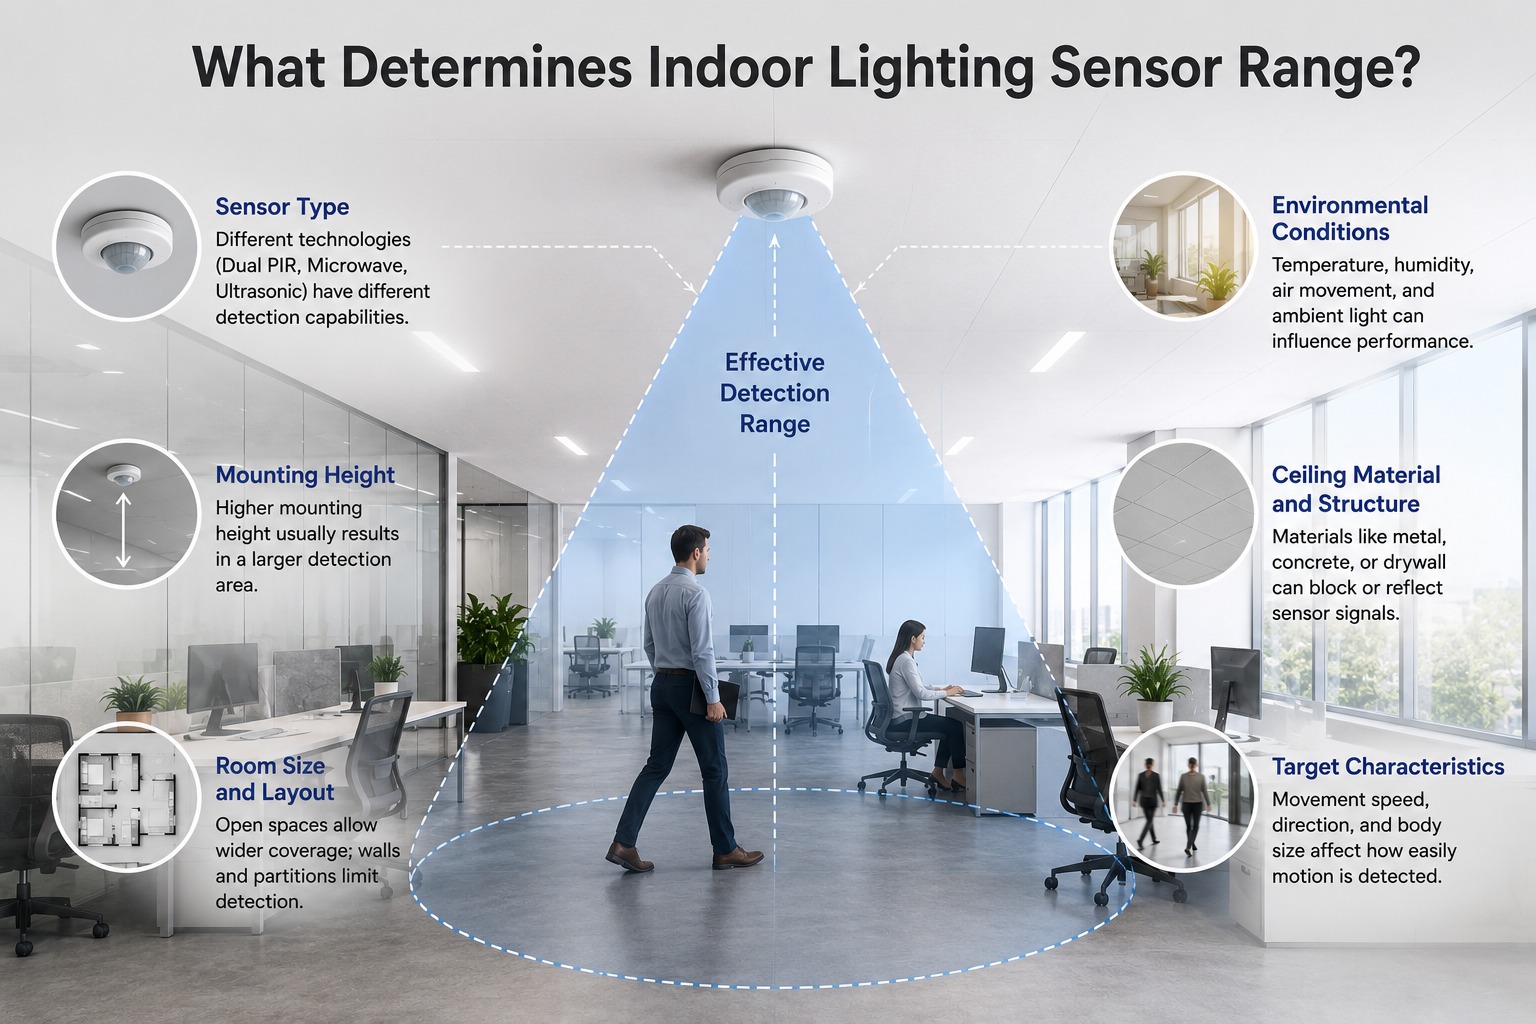
PIR: A strong option for enclosed areas with a clear view of the task zone. Partitions and furniture can block detection.
Microwave: Useful for some linear fixtures and open areas, but sensitivity must be adjusted to avoid triggers from reflective surfaces or adjacent spaces.
Ultrasonic: Can suit larger or partly obstructed areas, subject to the manufacturer’s application guidance.
Dual technology: Combines two sensing methods for demanding applications, but still requires correct placement and commissioning.
Coverage changes with mounting height. Always check the manufacturer’s coverage diagram at the proposed height and confirm whether it is rated for major motion, such as walking, or minor motion, such as typing at a desk.
Review walls, partitions, shelving, doors, machinery, HVAC airflow, fans, metal surfaces, entrances, and low-motion areas. Daylight conditions also matter. Luminaires close to windows may need a separate daylight sensor zone from luminaires in the interior of the room.
Define what the lights should do before selecting the sensor: automatic on/off, manual-on/automatic-off, stepped dimming, continuous dimming, daylight harvesting, scheduling, or a combination.
One sensor does not always need to cover an entire room if the luminaires are divided into multiple zones.
Space | Main Challenge | Practical Approach |
Private office | Seated occupants may be missed | Use focused coverage and test the desk, doorway, and corners |
Open-plan office | One oversized zone creates poor control | Divide perimeter and interior luminaires into coordinated zones |
Corridor or stairwell | Adjacent spaces can cause false triggers | Aim coverage along the travel path and test every entrance |
Classroom or meeting room | Layout and operating modes change | Use multiple zones, dimming, and documented settings |
Restroom | Stalls and corners may be missed | Confirm coverage at entrances, sinks, and every stall |
Warehouse or high-bay area | Height and racking create blind spots | Select a sensor rated for the height and aisle geometry |
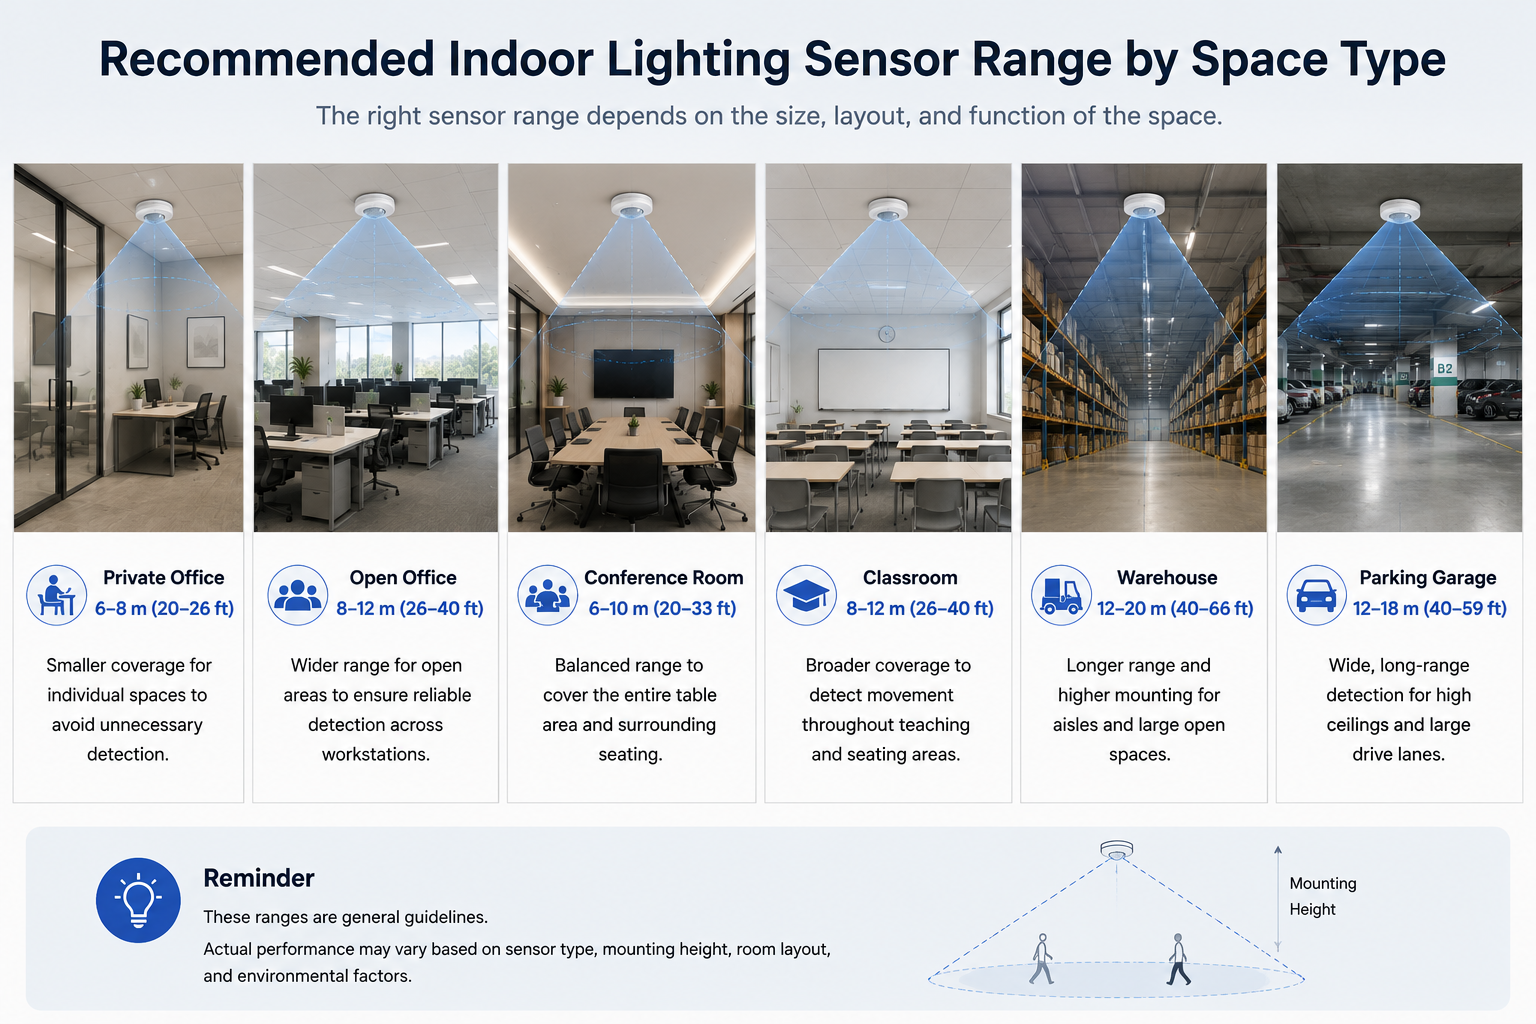
A wider detection field is not automatically better. It can waste energy in a small room, while a narrow field can reduce comfort in a large open space.
Define the control zone. Identify which luminaires should respond together. Start with the desired lighting behavior rather than the sensor’s maximum distance.
Map real movement. Mark entrances, walkways, desks, workstations, stalls, and low-motion areas.
Check the coverage diagram. Compare the actual mounting height with the manufacturer’s specifications and account for obstructions.
Match daylight zones. Separate window-side and interior luminaires when natural light levels differ significantly.
Review wireless architecture separately. For a wireless retrofit, confirm mesh communication, gateway requirements, commissioning tools, remote adjustment, and fallback behavior.
Commission and document the system. Test detection boundaries, sensitivity, time delay, dimming levels, daylight thresholds, and manual overrides after installation.
Wireless sensors can reduce new control wiring and installation disruption in occupied commercial buildings. However, wireless technology does not replace a coverage plan.
The installer still needs to map each sensor to the correct luminaire zone and verify both occupancy detection and network communication.
LumiEasy indoor sensor options combine occupancy and daylight sensing with Bluetooth Mesh lighting control.
The LumiEasy TL-NE-BPRW-MN-03-02 DC ceiling sensor lists 180° coverage, a maximum mounting height of 26 ft / 8 m in an open environment, and a photosensitive range of 10–1000 lux. These are product-specific values, not universal design rules. Always confirm the latest datasheet for each project.
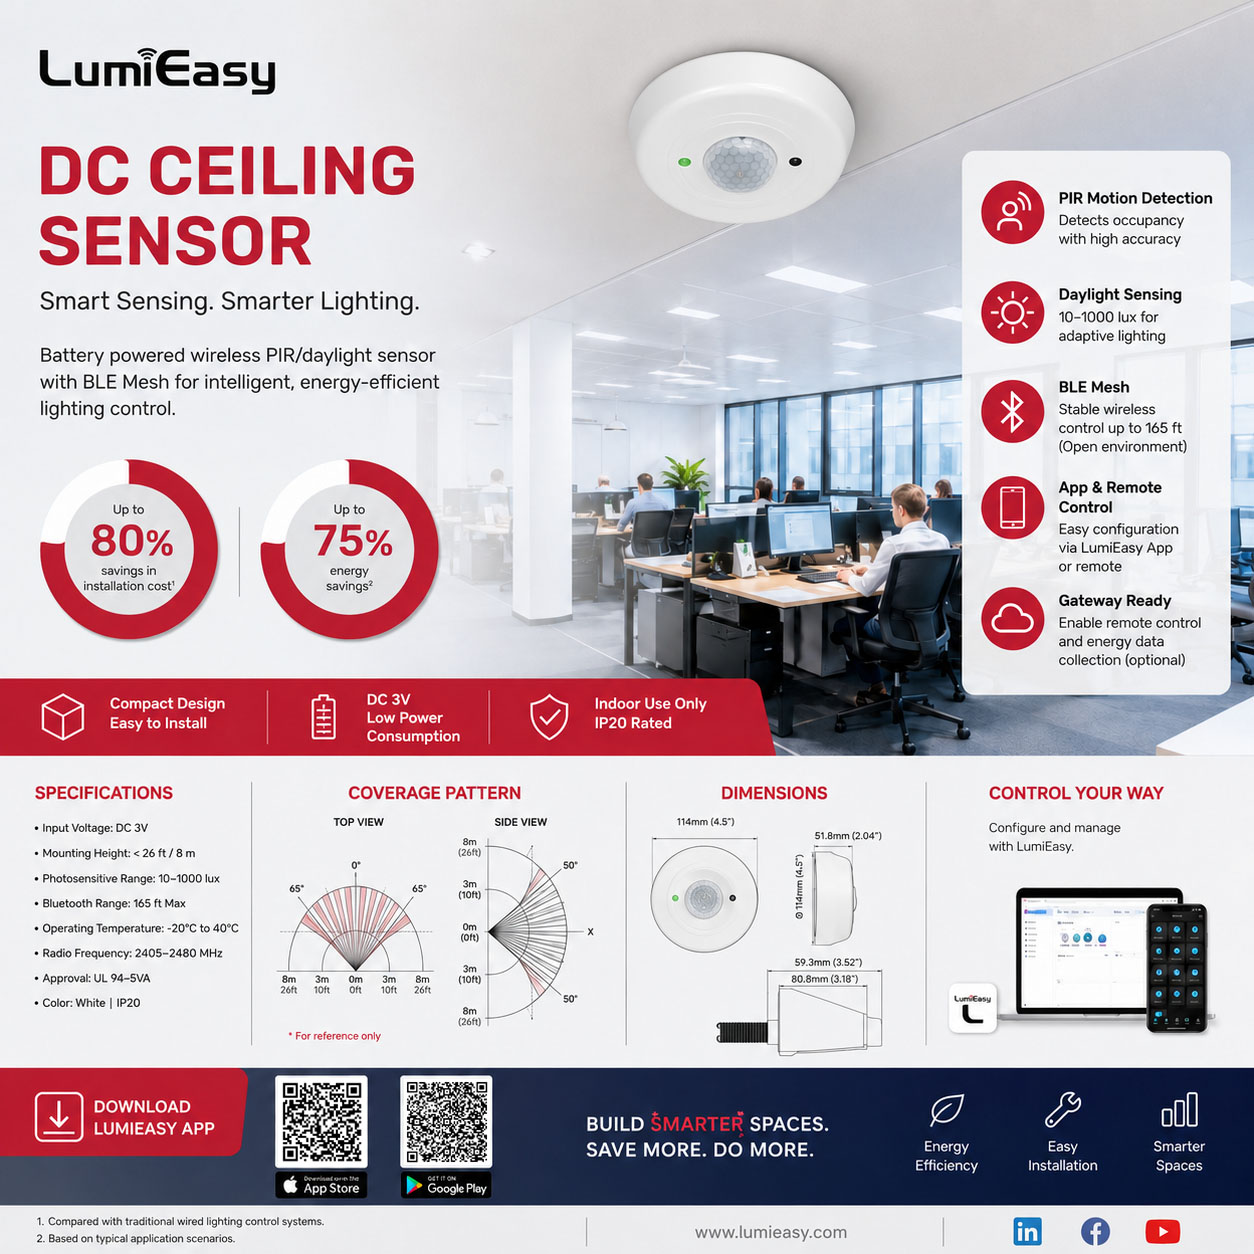
Explore the LumiEasy indoor smart sensor range for fixture-mounted, ceiling-mounted, PIR, microwave, controller, and Bluetooth Mesh options.
Yes, but actual savings depend on operating hours, occupancy patterns, daylight availability, timeout settings, and user acceptance.
The U.S. Department of Energy’s wireless-sensor guidance reports potential lighting-energy savings of 10% to 90%, depending on room type and usage. This is a project range, not a guarantee. Proper installation and adjustment are essential.
Detection range is the physical area where occupancy or movement can be detected. Wireless range is the communication distance between network devices. A sensor may communicate over a long distance while having a narrow or obstructed detection field.
There is no universal distance. Usable coverage depends on technology, coverage pattern, mounting height, movement type, obstructions, and the manufacturer’s diagram. Select the rated pattern at the actual installation height.
PIR often suits enclosed spaces with clear line of sight. Microwave may suit applications requiring adjustable sensitivity or a different detection pattern. Dual-technology sensors can be considered where missed detection is costly.
Use multiple coordinated zones rather than one oversized detection field. Separate perimeter and interior luminaires where daylight levels differ, and confirm that seated workstations are covered.
Yes. Confirm both the sensing field and the wireless architecture, including mesh topology, gateway requirements, control-zone mapping, commissioning tools, and fallback behavior.
Indoor lighting sensor range is a design parameter, not just a number on a product page. Match occupancy coverage, daylight sensing, mounting height, lighting zones, and communication architecture to the way each space is used.
For project-specific sensor selection, Contact us for a free quote!
Indoor Occupancy Lighting Sensor: Revolutionizing Intelligent Illumination in Indoor Spaces
Luminaire Level Lighting Control: Revolutionizing Commercial Smart Lighting Systems
Wireless Lighting Control: A Complete Guide for Commercial Projects
Silvair-Compatible Sensors for Bluetooth Mesh Lighting | LumiEasy


)
)
)
)

+86 15899791249

+86 755 2955 3313


Address: Huafeng No.1 Science and Technology Park, Sanwei, Bao'an District, Shenzhen, Guangdong, China.
